Building Code Runner - Part #1 : Creating An Overview And MERN Project Setup With PNPM and Vite
Learning how to create mind maps to understand what's needed for the project and setting up the project folder with required dependencies quickly.
I am a Software Engineer from Hyderabad. Here to learn and share what I learn.
Hello people 👋🏽
Hoping you all are safe. Firstly, sorry for not being able to bring up this article last week. It was a packed one with exams and other work.
I think this article will make up for the delay 🤞🏽
This article will be focusing on two aspects:
- Understanding the project and building a mind map for all future reference.
- Setting up the project folders and installing the required dependencies.
Building the Mind Map
The most critical part of building any application, for that matter solving any problem is analysing the functionalities and requirements of that problem.
A mind map is one of the many ways to put those points in a visual way. For smaller applications like these, the mind maps should be sufficient, but bigger applications need proper documentation.
The use cases and requirements of our Code Runner can be defined as follows:
- User should be able to type code in an editor with syntax highlighting, language specific suggestions and other features.
- User should be able to provide custom input.
- User should be able to run this program with or without the custom input.
- User should be able to save these codes, upon request.
- User should be able to retrieve codes or share them using a simple URL (UID in the slug).
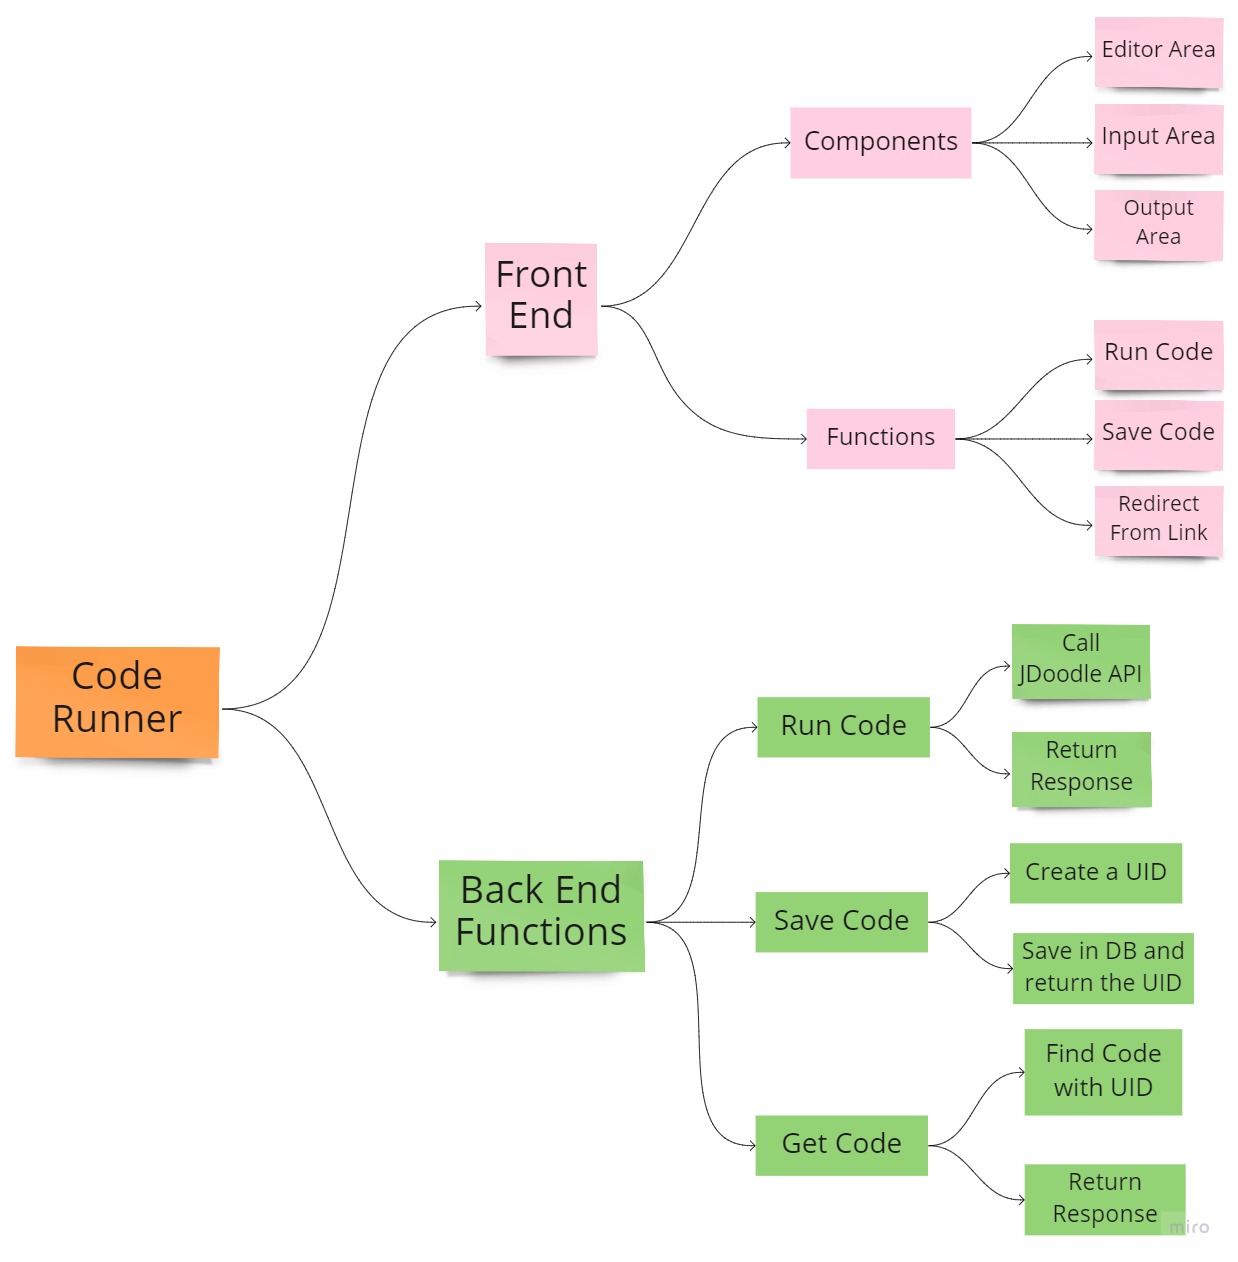
I use a tool called Miro to build these mind maps and store them for further reference. Below is a mind map for our project. It should explain for itself, and it is just an overview of the application. The implementation of it shall be looked into in detail during the development process.
We clearly define the required needs of our application on both the front-end and the back-end.
Project Setup
We will setup our project in an unconventional yet fast way which helps keep the development overhead processes like installations and builds less time consuming.
The default package manager we will be using is PNPM. It is a cache-enabled package manager which allows using shared node modules using hard links. It helps to reduce the space occupied on the disk and skips redownloading the modules each time you build a new project.
To install PNPM:
npm i -g pnpm
Server Folder Structure
Now that you have PNPM installed and ready, we can start creating the project folders and install dependencies.
Create a folder called CodeRunner with a subfolder called server. (Naming can be done according to your preference) and open the main folder in an IDE or terminal.
- Move into the server directory:
cd server - Initialize it as a node directory (I am using the default options here):
pnpm init -y - We will need express, mongoose, axios and other libraries to perform the operations. The use of each of the library will be discussed in the coming article.
pnpm install axios body-parser dotenv express mongoose nanoid nodemon - Create a file called
index.jswhich will serve as the entry point of our application. - Add the start script to the
package.jsonas follows:"scripts" : { "start" : "nodemon index.js" } - Add the following code to your index.js file:
require("dotenv").config();
const express = require("express");
const bodyParser = require("body-parser");
const cors = require("cors");
const app = express();
const mongoose = require("mongoose");

const mongoSRV = process.env.MONGO_SRV;
const port = process.env.PORT || 8000;

// Establising connection with MongoDB
mongoose.connect(mongoSRV, {
    "useNewUrlParser": true,
    "useUnifiedTopology": true,
    "useCreateIndex": true
})
.then(() => console.log("DB Connected"))
.catch((err) => console.log("Error connecting DB", err))

//To enable cross-origin-resources in our application
const corsOptions = {
    origin: "*",
    optionsSuccessStatus: 200
}
app.use(cors(corsOptions));

//To parse JSON body
app.use(bodyParser.json());

//Serving the application on Port
app.listen(port, () => {
    console.log(`App is running on PORT: ${port}`);
})
- Create a MongoDB Atlas instance and save the SRV value in a file called
.envin the server folder with key asMONGO_SRV. - Create sub-folders called
routes,controllersandmodelsin theserverfolder.
Client Folder Structure
- Create react app is the default way used to generate react applications but it is time consuming and uses NPM under the hood instead of PNPM.
- We shall use Vite to generate our react application and PNPM to install the dependencies.
- To generate the client application open the CodeRunner(project root) folder and run the following command:
This will generate a folder callednpm init @vitejs/app client --template reactclientinside the CodeRunner folder with the required files. You can refer to the documentation of Vite if you encounter any errors with respect to the versions of PNPM. - Now move inside the client folder:
cd clientand install the dependencies using:pnpm install - We will be using Chakra-UI and react-ace in the client application, so install them as well.
pnpm install @chakra-ui/react @emotion/react@^11 @emotion/styled@^11 framer-motion@^4 @chakra-ui/icons react-ace ace-builds - To check if the setup is ready, run:
It should generate the dev-build of the client folder and open it in browser.pnpm dev
Your final Project folder should look like this with the node_modules folder .env file included.
That's all for today folks.
Let's discuss the implementation of the server application in the next article.
Subscribe to the newsletter for the upcoming articles. 📫
Stay safe everyone ❤
Until next Sunday,
Manish Reddy Nandineni.